Part 1: Install Linux Server on iSCSI disk
Part 2: Boot Linux Server from LAN using iSCSI
Part 1: This article explains how to install Linux Server (diskless) on iSCSI Disk using network (iSCSI protocol).
Table of contents:
- Install and Configure iSCSI Target
- Install and Configure DHCP Server
- How to install Linux Server using iSCSI.
1. Install and Configure iSCSI Target (step 1):
In computing, iSCSI is an acronym for Internet Small Computer System Interface, an Internet Protocol (IP)-based storage networking standard for linking data storage facilities. By carrying SCSI commands over IP networks, iSCSI is used to facilitate data transfers over intranets and to manage storage over long distances. iSCSI can be used to transmit data over LANs, WANs… The protocol allows clients (called initiators) to send SCSI commands to SCSI storage devices (targets) on remote servers. It is a storage area network (SAN) protocol, allowing organizations to consolidate storage into data center storage arrays while providing hosts with the illusion of locally attached disks, for more information.
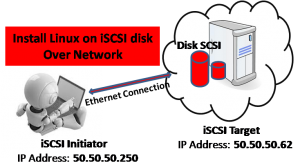
iSCSI Initiator & iSCSI Target
Step 1: To install SCSI Target with RedHat or CentOS, you can use:
# yum install scsi-target-utils
To configure your iSCSI server (Target):
# vi /etc/tgt/targets.conf
<target iqn.2013-11.tn.wadhahdaouehi:RedHatiSCSI>
 <backing-store /dev/sdb>
 vendor_id wadhahdaouehi
 product_id iSCSI_RedHat
 product_rev "1.1"
 scsi_id scsi_id_01
 scsi_sn 00112233445566
 lun 1
 </backing-store>
</target>
Start your SCSI target service
# service tgtd start
And for auto start after reboot:
# chkconfig tgtd on
To verify the iSCSI Target configuration:
# tgt-admin -s
Target 1: iqn.2013-11.tn.wadhahdaouehi:RedHatiSCSI
    System information:
        Driver: iscsi
        State: ready
    I_T nexus information:
    LUN information:
        LUN: 0
            Type: controller
            SCSI ID: IET     00010000
            SCSI SN: beaf10
            Size: 0 MB, Block size: 1
            Online: Yes
            Removable media: No
            Readonly: No
            Backing store type: null
            Backing store path: None
            Backing store flags:
        LUN: 1
            Type: disk
            SCSI ID: scsi_id_01
            SCSI SN: 00112233445566
            Size: 4295 MB, Block size: 512
            Online: Yes
            Removable media: No
            Readonly: No
            Backing store type: rdwr
            Backing store path: /dev/sdb
            Backing store flags:
    Account information:
    ACL information:
        ALL
2. Install and configure DHCP Server (step 2):
The Dynamic Host Configuration Protocol (DHCP) is a standardized networking protocol used on IP networks that dynamically configures IP addresses and other information that is needed for Internet communication. DHCP allows computers and other devices to receive an IP address automatically from a central DHCP server, reducing the need for a network administrator or a user from having to configure these settings manually, for more information.
Step 2: To Install DHCP Server:
# yum install dhcp
To configure the DHCP Server :
# vi  /etc/dhcp/dhcpd.conf
ddns-update-style none;
default-lease-time 600;
max-lease-time 3600;
subnet 50.50.50.0 netmask 255.255.255.0 {
        range 50.50.50.250 50.50.50.252;
        option broadcast-address 50.50.50.255;
        option subnet-mask 255.255.255.0;
        option routers 50.50.50.62;
}
To start the DHCP server
# service dhcpd start
For auto boot after reboot
# chkconfig dhcpd on
3. How to install Linux Server using iSCSI (step 3):
Create a Virtual Machine for example using VirtualBox. Step 3:
Conclusion:
This article explains how to install a Linux server on iSCSI disk, for more explanation please visite my youtube channel: wadhahdaouehi
Part 2: Boot Linux Server from LAN using iSCSI