Part 1: Install Linux Server on iSCSI disk
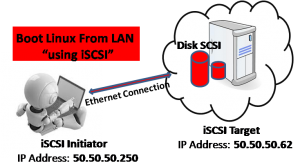
Part 2: Boot Linux Server from LAN using iSCSI
Part 2:
This tutorial explains how to boot Linux Server from LAN using iSCSI protocol.
Table of Contents:
- Install and configure tftp server
- Re-configure dhcp server
- Boot Linux Server from LAN using iSCSI
1. Configure TFTP server (step 1):
Trivial File Transfer Protocol (TFTP) is a file transfer protocol notable for its simplicity. It is generally used for automated transfer of configuration or boot files between machines in a local environment. Compared to FTP, TFTP is extremely limited, providing no authentication, and is rarely used interactively by a user.
Due to its simple design, TFTP could be implemented using a very small amount of memory. It is therefore useful for booting computers which may not have any data storage devices. It is an element of the Preboot Execution Environment (PXE) network boot protocol, for more information.
Boot Linux Server from LAN (using iSCSI)
Step 1: How to install and configure tftp-server and syslinux
a- Configure the TFTP server
To Install TFTP server
# yum install tftp-server
To configure the tftp server:
# vi /etc/xinetd.d/tftp
# default: off
# description: The tftp server serves files using the trivial file transfer \
#       protocol.  The tftp protocol is often used to boot diskless \
#       workstations, download configuration files to network-aware printers, \
#       and to start the installation process for some operating systems.
service tftp
{
        socket_type             = dgram
        protocol                = udp
        wait                    = yes
        user                    = root
        server                  = /usr/sbin/in.tftpd
        server_args             = -v -s /var/lib/tftpboot
        disable                 = no
        per_source              = 11
        cps                     = 100 2
        flags                   = IPv4
}
To start the tftp server:
# service xinetd start
For auto start after reboot
# chkconfig xinetd on
b- Configure the syslinux:
The SYSLINUX Project is a suite of lightweight IBM PC MBR bootloaders for starting up computers with the Linux kernel.
PXELINUX is used in conjunction with a PXE compliant ROM on a network card. The PXE environment uses DHCP or BOOTP to enable basic TCP/IP networking, and then downloads abootstrap program via TFTP. This bootstrap program loads and configures a kernel according to directives that are also downloaded from the TFTP server, for more information.
To install the syslinux:
# yum install syslinux
Copy the pxelinux.0 and menu.c32 to the tftp folder:
# cp /usr/share/syslinux/menu.c32 /usr/share/syslinux/pxelinux.0 /var/lib/tftpboot/
Copy the Kernel file and init ram disk file from the grub partition.
Note 1: In my case, I used the hard disk /dev/sdb like iSCSI disk
# partprobe
# mount /dev/sdb1 /mnt/sdb
# cd /mnt/sdb
# cp initramfs-2.6.32-220.el6.i686.img vmlinuz-2.6.32-220.el6.i686 /var/lib/tftpboot/
# cd /var/lib/tftpboot/
# mkdir pxelinux.cfg
Note 2: in the file default, the parameters of the kernel and initrd have taken from the file /mnt/sdb/grub/grub.cfg
 # vi pxelinux.cfg/default
UI menu.c32
label ReHat
menu LABEL ^Boot RedHat from LAN (using iSCSI)
kernel vmlinuz-2.6.32-220.el6.i686 ro root=/dev/mapper/vg_redhat-lv_root rd_NO_LUKS ifname=eth0:08:00:27:4e:6a:70 iscsi_initiator=iqn.2013-11.tn.wadhahdaouehi:initiatorRedhat rd_NO_MD ip=eth0:dhcp rd_LVM_LV=vg_redhat/lv_swap quiet SYSFONT=latarcyrheb-sun16 rhgb crashkernel=auto netroot=iscsi:@50.50.50.62::3260::iqn.2013-11.tn.wadhahdaouehi:RedHatiSCSI rd_LVM_LV=vg_redhat/lv_root  KEYBOARDTYPE=pc KEYTABLE=fr-pc rd_NO_DM LANG=en_US.UTF-8
initrd initramfs-2.6.32-220.el6.i686.img
2. Re-Configure DHCP server (step 2):
The Dynamic Host Configuration Protocol (DHCP) is a standardized networking protocol used on IP networks that dynamically configures IP addresses and other information that is needed for Internet communication. DHCP allows computers and other devices to receive an IP address automatically from a central DHCP server, reducing the need for a network administrator or a user from having to configure these settings manually, for more information.
Step 2:
To configure the DHCP Server :
# vi  /etc/dhcp/dhcpd.conf
ddns-update-style none;
default-lease-time 600;
max-lease-time 3600;
subnet 50.50.50.0 netmask 255.255.255.0 {
        range 50.50.50.250 50.50.50.252;
        option broadcast-address 50.50.50.255;
        option subnet-mask 255.255.255.0;
        option routers 50.50.50.62;
}
host redhat.wadhahdaouehi.tn {
        allow booting;
        allow bootp;
        next-server 50.50.50.62;
        filename "pxelinux.0";
        option routers 50.50.50.62;
        option host-name "redhat.wadhahdaouehi.tn";
        fixed-address 50.50.50.250;
        hardware ethernet 08:00:27:4E:6A:70;
}
3. Boot Linux Server from LAN (using iSCSI) (step 3):
This video explains how to boot your Linux server from LAN using iSCSI protocol.
Or check this video on my YouTube channel.
Conclusion:
This tutorial explains how to boot your Linux Server from LAN using the iSCSI Protocol.
Part 1: Install Linux Server on iSCSI disk